A quick-start guide for your first appointment in EZClaim Scheduling
To easily navigate this article, use the links provided below. At the end of each section, click "Back to Top" to return to this menu.
Your First Appointment Quick Start
Your First Appointment Quick Start
Begin by creating your Resources, which are Persons, Places, or Things that require scheduling. For example, a patient may be scheduled with a specific doctor, exam room, and/or equipment.
- Select the ‘Setup’ icon
from the menu bar.
- Click on the ‘Resources’ tab
- Click in the blank line beneath the column headers to enter the resource name and additional information.
- Continue adding ‘Resources’ and ‘Resource Attributes’ as needed.
- Select Filters at the bottom of the dialog box to assign user options.
- Click ‘Save’ and then ‘Close’.
- Use the dropdown arrow to verify that your resources are now listed.


Create an appointment
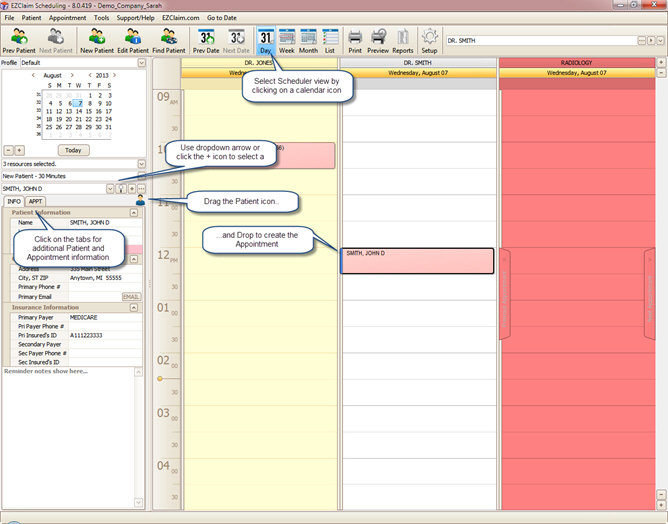
- Select the Scheduler view by clicking on a ‘View’
icon on the ribbon bar. Scheduler can be viewed as Day, Week, or Month and can be changed at any time by clicking a different view icon.
- Select a Patient to schedule using the dropdown arrow on the left sidebar.
- You can now ‘Drag’ the patient icon and ‘Drop’ it into a timeslot to create an appointment, or you can double-click a timeslot to create an appointment for that patient.
- Once the appointment is created, you can double-click or right-click the appointment to modify appointment properties.
What’s Next?
We suggest reviewing the following topics to help you set up the program and understand the features.
- Scheduler Screen Overview– Become familiar with the icons and screen area names
- Program Setup – Add doctors (resources), set your colors and other program options
- Patients – Add, Edit, and Find patient information
- Appointments– Add, Edit, and Find appointments. Includes setting the appointment attendance status.
- Blocking Appointments– Create blocking appointments for lunch breaks and other ‘un-available’ times
- Printing a Schedule – How to print the schedule
- View Options – Change the calendar view and show or hide resources
Additional Program Features
- Reports – Print different schedule formats and other reports
- Appointment Templates – Use appointment templates to quickly create an appointment with certain properties such as color, border, or description.
- Appointment Waiting List – Add patients to a waiting list and quickly find them when a timeslot opens up in the schedule.
- Tracking Authorizations – Track who is authorized and who is not.
- Patient Payments – Entering payments and printing receipts.
- Superbill Report – Customizing the superbill report.