Learn everything there is to know about the Patient View and different Patient options in EZClaim
To easily navigate this article, use the links provided below. At the end of each section, click "Back to Top" to return to this menu.
The Patient Information Screen
Replace All with Insurance From Claim
The Patient Information screen allows users to efficiently manage and organize Patient, Insurance, Provider, and Statement information. Additionally, users have the ability to input Reminder and Patient notes, as well as add up to five Customized fields for further customization.
Tip: If you find that the Save & Close button is not visible when you scroll to the bottom of the patient screen, no need to worry. You can simply use the Alt-S shortcut (Windows) or Opt-S (MacOS) to save and close the window, or you can also utilize the buttons on the ribbon bar.

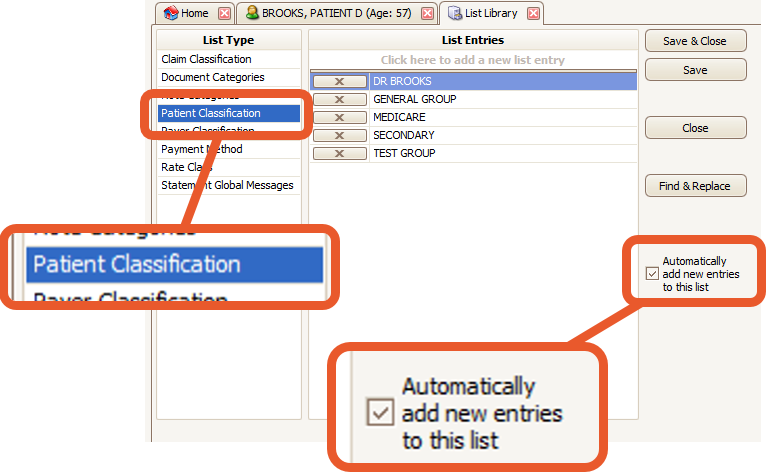
Patient Classification
Patient Classifications are a valuable tool for organizing and labeling patients for internal tracking and reporting purposes, although they are not mandatory.
Similarly, Claim Classifications can be assigned at the individual claim level as needed. These classifications can be used in addition to or instead of Patient Classifications. For instance, the Claim List report criteria can be filtered by Patient and/or Claim Classification.
Note: Classifications are never printed on paper claims or sent with electronic claims, so they remain invisible to the payer
To use Classifications, you'll need to create them in the List Library. For information on how to access the List Library, please review the List Library article.

- Uncheck the box above if you do not want the program to auto-store new entries
- The classification field can hold 30 characters
Claim Templates
Patients can be assigned specific Claim Templates on the Patient Information screen for most or all claim charges.
If a Claim Template has been selected, it will automatically be applied when creating a new claim.
You have the flexibility to change the Claim Template at any time on either the Patient Info screen or the Charges screen.
Note: Selecting a different Claim Template will not impact existing data. For more information on selecting Claim Templates, please refer to the Claim Templates article.

Account #
You have the option to configure EZClaim to automatically generate a patient account number or allow you to manually enter one. To access this option, you will navigate to Program Setup and select Patient.

- Check the Automatic Account Numbers check box if you would like EZClaim to automatically generate account numbers for you
- Uncheck the box if you would like to manually enter account numbers
Replace All with Insurance from Claim
At times, patients may switch between different payers. To simplify the process, you can effortlessly update the patient's insurance information with the data from a previous claim.

When you click this button, a Find Claim window will appear, allowing you to select the previous claim.

Note: By selecting a previous claim, all patient insurance records will be replaced with the insurance records from the selected claim
Update Claims Button
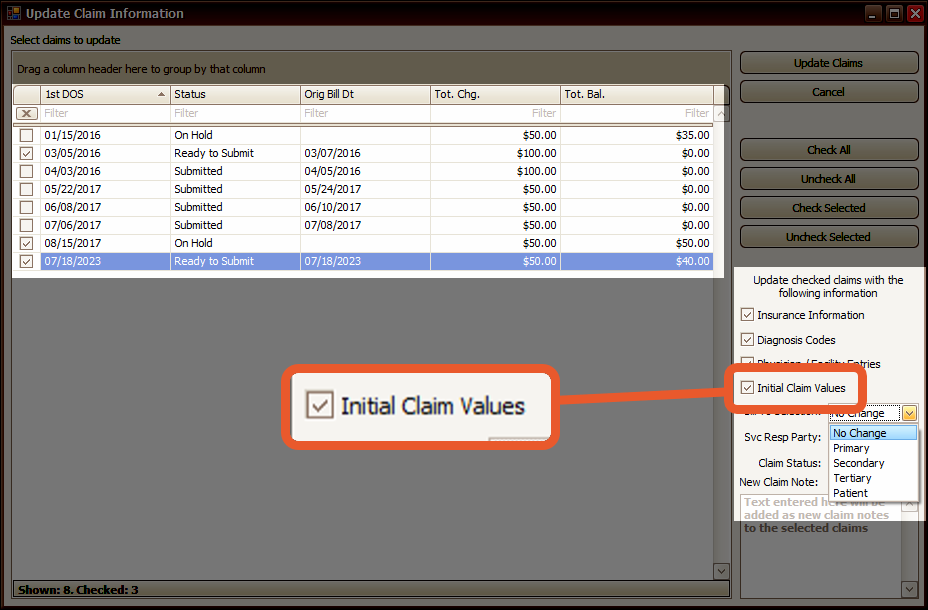
The Update Claims button provides the option to modify one or more claims for a patient. This functionality is typically utilized when there has been an error in patient data entry and multiple claims need to be updated.

When you click the Update Claims button, a list of the patient's claims will be displayed.
You can change the following information:
- Insurance Information
- Diagnosis Codes
- Physician / Facility Entries
- Initial Claim Values
- Bill To selection
- This will also cause the submission Method to be updated if needed
- Service Line Responsible Party
- Claim Status
- Claim Notes

Updating Claims
- Click the Update Claims button
- Select the claims to update
- Place a check on the items to update and/or select from the drop-down lists
- Click the Update Claims button

Additional Claim Information
Click on the expander arrow to open Additional Claim Information.
Select Signature Source to print Signature on File in boxes 12 and/or 13.

Initial Claim Values
To add initial claim values, click on the Initial Claim Values button and then click Add a new row. Select the items you want to include.
Note: You must close and reopen the patient record for the changes to take effect. The information entered in this section will only be used when creating new claims.


Existing claims will not be updated unless you click the Update Claims button after saving changes to the Patient record.
The Update Claims button will remain disabled until at least one claim has been selected. However, you can still edit the initial claim values on the Charges screen after creating the new claim.

Note: Claim-specific information should be entered directly on the Charges screen in the ‘Claim Information’ grid.
Additional Data
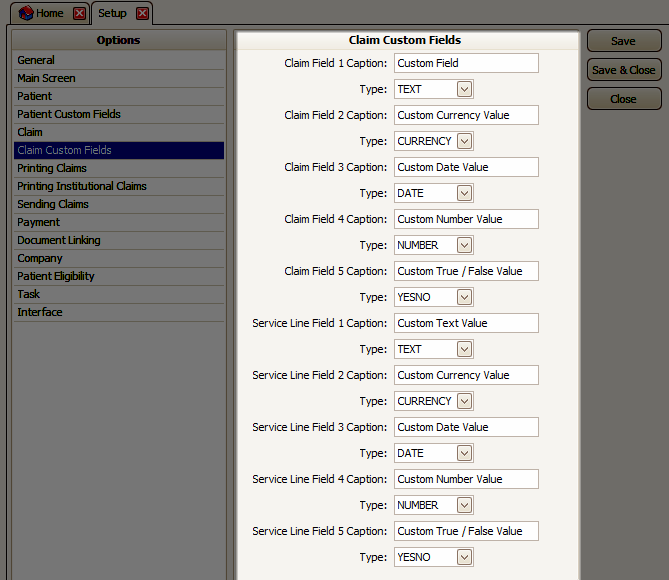
EZClaim provides users with the option to customize 5 data fields on the Patient screen and 5 data fields on the Claim screen. Additionally, users can customize 5 Service Line Fields. These fields can be tailored to accommodate various types of data entry.


Go to Tools → Program Setup → Patient (or Claim) Custom Fields to access.
These custom fields are displayed in the Additional Data section of the patient record.
Statement Information
To customize the name and address on patient statements, you can enter different information in the Statement Information area. This will be the name and address used for mailing statements to this patient.
- Statement Message - used to print a personalized message on statements
- Last Statement Date - shows the last time a statement was printed for the patient
- Don’t Send Statements - Check this box if you do not want the patient to appear in the statement list
- Don’t Send Promotions - This field is not currently used by EZClaim

Reminder Note
The Reminder Note serves as a message that appears in the search pane of both the Billing and Scheduling programs. It is also utilized as a popup text when creating appointments or indicating whether appointments have been attended or not (KEPT or NOT KEPT) statuses.
Note: Reminder Note Prompts may only be used with the EZClaim Scheduler program


