Multiple different "Find Grids" available in EZClaim
To easily navigate this article, use the links provided below. At the end of each section, click "Back to Top" to return to this menu.
Additional Options in Grids (right-click menu)
Accessing the Find Grids
The Find Grids can be accessed by clicking the Find button located in the top ribbon bar.

Additional Options in Grinds (right-click menu)
Most of the Find Grids have the same options when you right-click on a cell. They are outlined below

- Copy – Copy the text in the current cell
- Select All – Select all the items currently showing in the grid
- Set Claim Classification...
- Set Claim Method...
- Set Claim Primary Payer...
- Set Claim Status...
- Set Physicians...
- Write Off Selected Claim(s) – Will add an adjustment to each non-zero balance service line on the claim effectively zeroing out the claim balance.
- Pay Off Selected Claim(s) – Will create a payment and disburse it to all the service lines on the selected claims.
Note: This option is only available if all the selected claims have the same Bill To
- Create Tasks Linked to Associated Claim(s)... – A task will be created for each claim that is associated with the current selection.
- Create Claim Notes Linked to Selected Claim(s)... - A note will be created for each claim that is associated with the current selection.
- Quick Reports - Opens a selection of reports that can be run for the Claim or Patient associated with the current selection.
Find Adjustment

Click on the Find button and select Find Adjustment
- Enter a patient name or other data in the Filter boxes or click on any column heading to sort data. Adjustment data will be displayed.
- Click on Open or double-click to open the Adjustment information on a service line.
- Right-click to open the additional options menu
Special Actions

- Write Off Service Line(s) - Will add an adjustment to each non-zero balance service line effectively zeroing out the claim balance.
- Delete Adjustments... – Deletes the selected adjustments.
Find Claim

Click on the Find button and select Find Claim
-
Enter data into the filter row to filter the claim list.
-
Click on ‘Open’ or double-click to open the claim information.
- Right-click to open the additional options menu
Find Claim Note

- Use Filter boxes for sorting data or click on any column heading to sort by selected column.
- Click on Open or double-click to open the claim screen containing the note.
- Right-click to open the additional options menu
Find Disbursement

- Click on the Find button and select Find Disbursement to quickly find disbursements associated with Claims
- Use Filter boxes for sorting disbursement data or click on any column heading to sort by the selected column.
- Click on Open or double-click to open the claim screen showing disbursements.
Find Patient

- Click on the Find button and select Find Patient.
- Enter the patient name or other data in the Filter field and patient data will be displayed.
- Click Open or double-click to access the patient information.
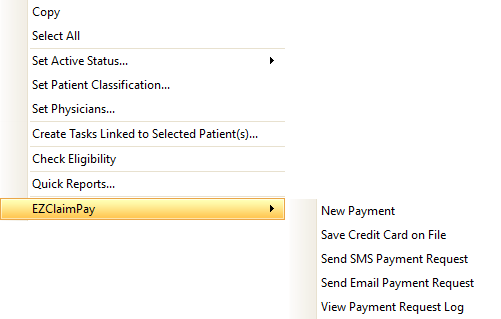
Special Actions

- Set Active Status
- Active
- Inactive
- Patient Classification
- Set Physicians
- Check Eligibility
- EZClaimPay (if activated)

Find Payer

- Click on the Find button and select Find Payer to quickly find payer information previously set up in the Payer Library.
- Use Filter boxes for sorting payers or click on any column heading to sort by the selected column.
- Click on Open or double-click to open Payer information in the Payer Library.
Special Actions

- Set Payment Matching Key
Find Payment

- Click on the Find button and select Find Payment to quickly find Payment information.
- Use Filter boxes for sorting payments or click on any column heading to sort by the selected column.
- Click on the Modify button to open the Payment information in the Payment Modification screen.
- Click the Disburse button to disburse the payment.
Note: The Disburse button will only be enabled if there is a remaining balance.
- It is possible to delete payments in bulk from the find payment screen by right-clicking a group of payments.
Special Actions

- Modify Payment
- Delete Payment
Find Physician

- Click on the Find button and select Find Physician to quickly find physician information previously set up in the Physician/Facility Library.
- Use Filter boxes for sorting billing provider data or click on any column heading to sort by the selected column.
- Click on Open or double-click to open the Physician information in the Physician/Facility Library.

Find Service Line

- Click on the Find button and select Find Service.
- Enter the patient name or other data in the filter box and patient data will be displayed.
- Click on any column heading to sort data.
- Click on Open or double-click to open the service line information.
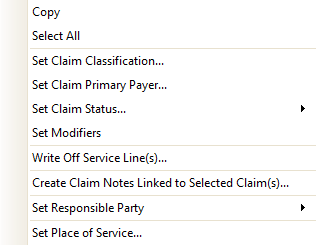
Special Actions

- Set Modifiers
- Set Responsible Party
- Set Place of Service
Find Task

- Click on the Find button and select Find Task.
- Enter the patient name or other data in the Filter box or click on any column heading to sort data. Task data will be displayed.
- Click on Open or double-click to open the Task.
Special Actions

- Mark as
- Set Priority to
- Assign to
- Remove Reminder
- Delete Task
